It started with a smoke alarm, a very dramatic six-year-old, and what can only be described as chicken jerky. I was heated too high, got distracted by a homework crisis, and came back to find my beautiful pineapple chicken and rice looking like a sad campfire story. Mia fanned the air with a folder. Ben said, very seriously, “Mom, I don’t think we should eat that.” We ordered pizza.
Why This Recipe Is Special
But here is the thing about cooking with your kids watching: they remember everything. The week after my little disaster, Ben asked if we could “try the pineapple chicken again, but maybe not burnt this time.” That completely unsolicited vote of confidence is what got me back in the kitchen. This dish is sweet, sticky, a little caramelized, and packed with flavor that feels like takeout but better. It is our Friday night tradition now, and both kids ask for it by name.
How To Make Pineapple Chicken and Rice
My first real attempt (the successful one, not the smoke alarm incident) taught me something important: patience. I was rushing, as usual, with Mia sitting on the counter and Ben reading over my shoulder, narrating every step like a sports commentator. When the sauce hit the hot pan and that caramelized pineapple smell filled the kitchen, Mia announced, “It smells like a vacation.” Ben immediately countered, “It smells like Hawaii.” We had never been to Hawaii. I told them that was precisely the point.
The turning point was learning to dry the chicken pieces really well before they hit the pan. My first burnt attempt? I had skipped that step entirely. Wet chicken steams instead of sears, and you end up with sad, gray pieces instead of those gorgeous caramelized edges. Ben now considers himself the official chicken-patting expert, which means he stands on a step stool with a paper towel looking very pleased with himself.
Main Ingredients
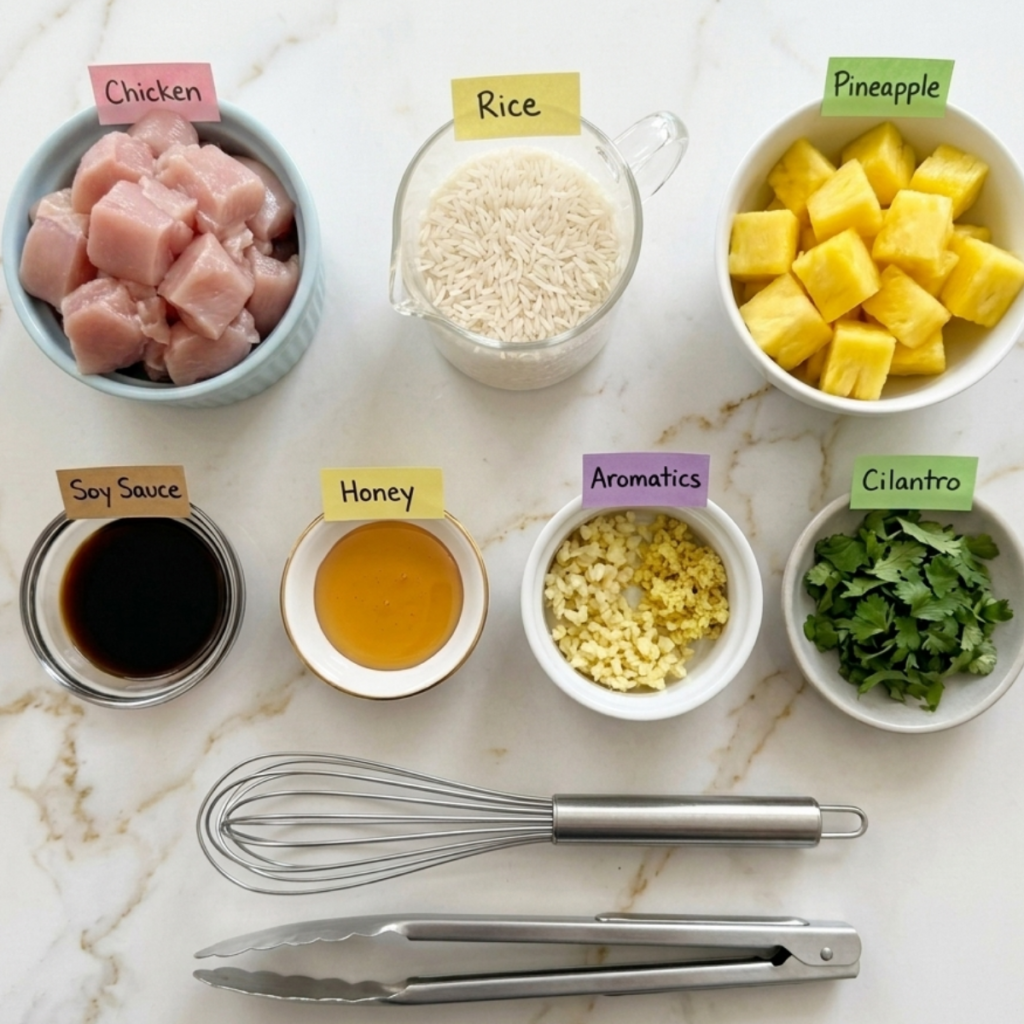
- 1.5 lbs boneless, skinless chicken thighs, cut into 1-inch pieces: Thighs stay juicy even if you pull them a minute late; breasts dry out fast
- 1.5 cups long-grain white rice: The starchy base that soaks up every drop of that sticky sauce
- 1 can (20 oz) pineapple chunks in juice, drained (juice reserved): The juice goes in the sauce; canned is more consistent than fresh here
- 3 tablespoons soy sauce: Depth and saltiness; use low-sodium if you are watching salt
- 2 tablespoons honey: Brings the sticky glaze; do not skip or substitute with maple syrup for this one
- 1 tablespoon rice vinegar: Brightens the whole sauce and balances the sweetness
- 1 tablespoon sesame oil: Adds that unmistakable toasty aroma; a little goes a long way
- 3 cloves garlic, minced: Non-negotiable flavor backbone
- 1 teaspoon fresh ginger, grated: Gives the dish its warmth; ground ginger works in a pinch
- 1 tablespoon cornstarch: Thickens the sauce into that glossy, clingy glaze
- 2 tablespoons neutral oil (vegetable or avocado) – High smoke point so you get a proper sear
- Salt and black pepper: Season the chicken before it hits the pan
- Fresh cilantro for garnish: Optional but highly recommended; my kids pick it off and I eat theirs
Step-by-Step Instructions
Step 1: Make Your Sauce
- Whisk together the soy sauce, honey, rice vinegar, and sesame oil in a small bowl
- Add 3 tablespoons of the reserved pineapple juice and stir to combine
- Whisk in the cornstarch until completely smooth with no lumps
- Set aside close to the stove so it is ready when you need it
Step 2: Cook the Rice
- Rinse the rice in cold water until it runs mostly clear, about 30 seconds
- Combine rice with 3 cups of water in a saucepan, bring to a boil, then reduce to a simmer
- Cover and cook on low heat for 18 minutes without lifting the lid
- Remove from heat and let it steam, still covered, for another 5 minutes
Step 3: Sear the Chicken
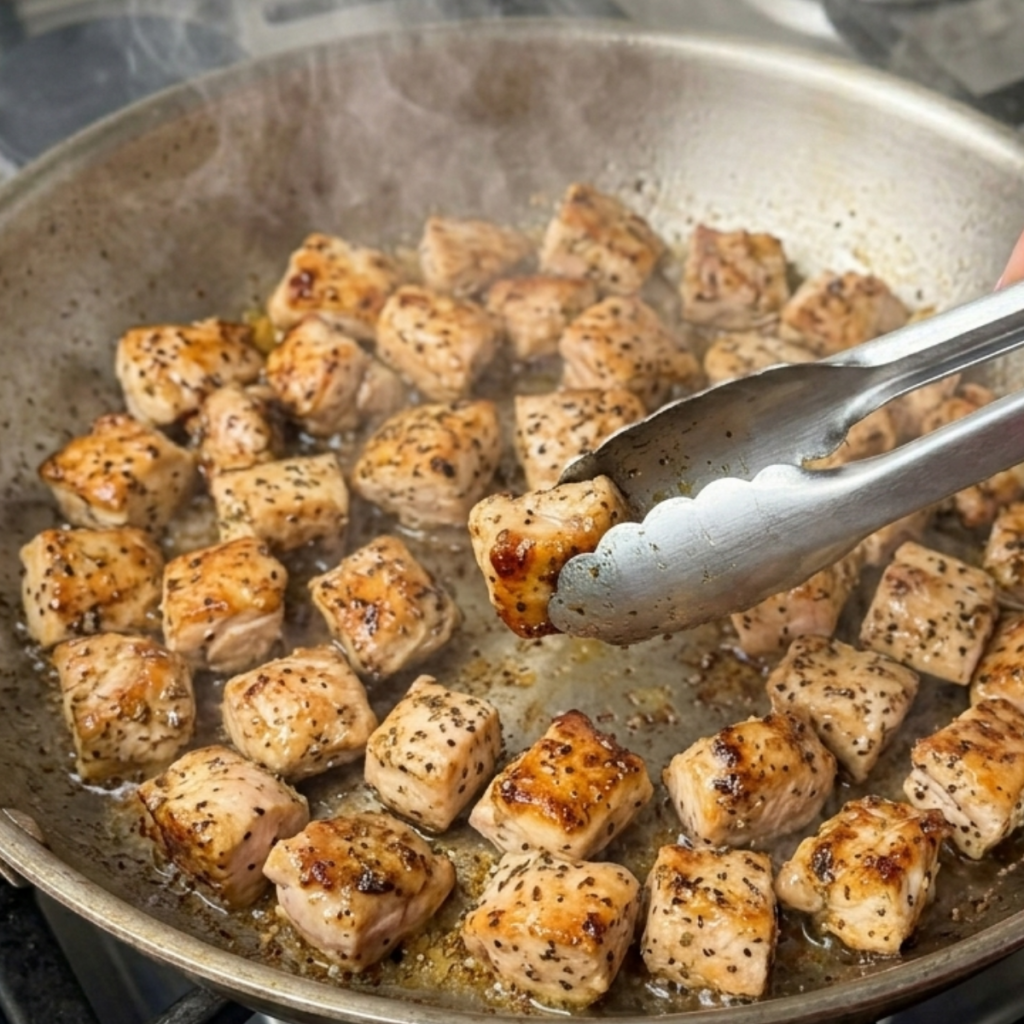
- Pat the chicken pieces completely dry with paper towels, then season generously with salt and pepper
- Heat the neutral oil in a large skillet or wok over medium-high heat until shimmering
- Add the chicken in a single layer and work in two batches if pieces are crowding the pan
- Cook 3 to 4 minutes per side without moving until deeply golden, then remove and set aside
Step 4: Build the Dish
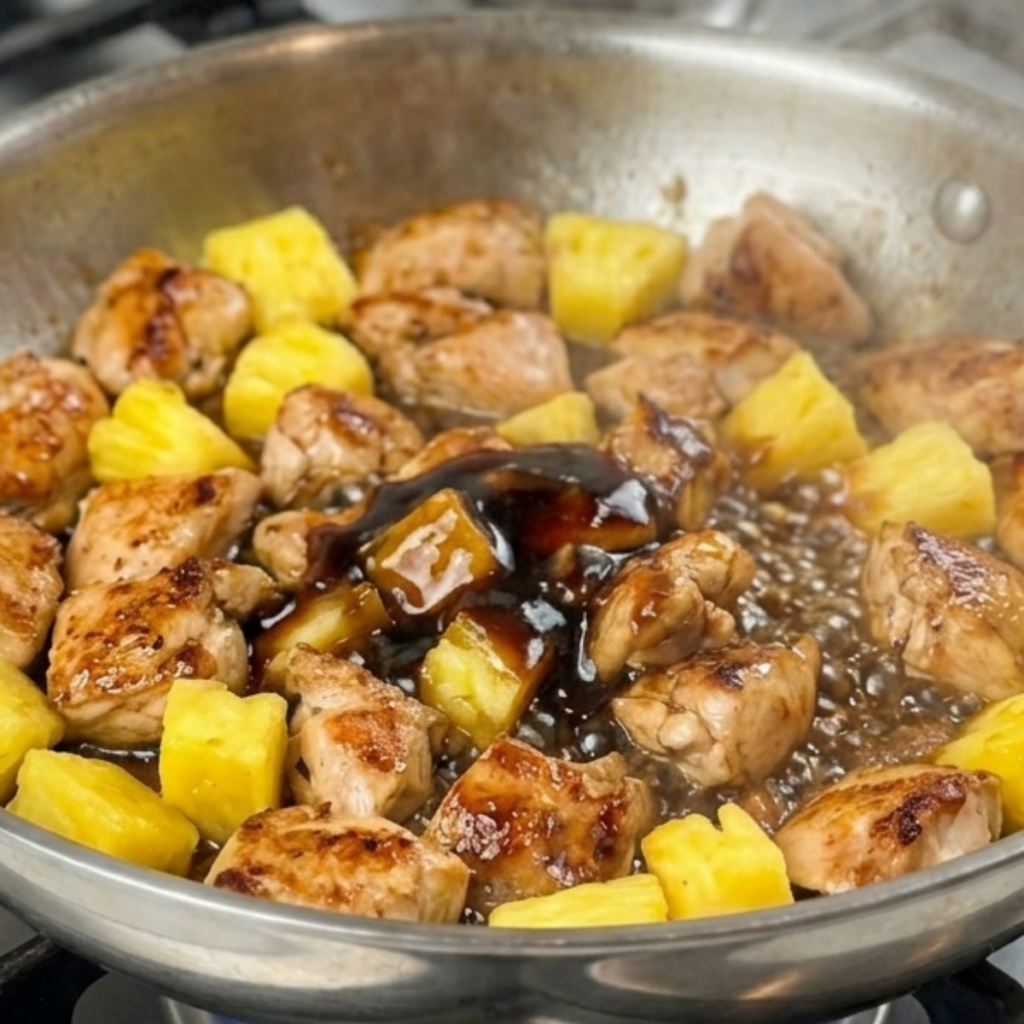
- In the same pan, sauté the garlic and ginger for 30 seconds until fragrant
- Add the pineapple chunks and cook for 2 minutes until they pick up some color on the edges
- Return the chicken to the pan, pour the sauce over everything, and toss to coat
- Cook for another 2 to 3 minutes, stirring gently, until the sauce thickens and coats every piece
Pineapple Chicken and Rice Variations
The “Make It Spicy, Mom” Version
Ben went through a phase at age seven where everything had to be spicy. He had zero tolerance for actual heat but insisted on asking for it anyway. For those of you with braver palates (or braver kids), add a tablespoon of sriracha or chili garlic sauce directly into the sauce mixture. A pinch of red pepper flakes in the pan with the garlic also does the trick. The sweet pineapple plays beautifully against the heat.
Mia’s No-Cilantro, Extra-Pineapple Bowl
Mia has very strong opinions about cilantro. She says it tastes like “soap and sadness,” which is honestly fair. For the cilantro-averse members of your family, skip it entirely and double the pineapple chunks for a sweeter, fruitier result. She also likes hers served with the rice on the side instead of mixed in, which she calls “fancy restaurant style.”
The Weeknight Sheet Pan Remix
On the nights when even standing at the stove feels like too much, I skip the skillet entirely. Toss the marinated chicken and pineapple chunks on a sheet pan, roast at 425 degrees Fahrenheit for 20 to 22 minutes, then drizzle the sauce (cooked separately in a small saucepan for 2 minutes) over the top. You lose a little of the caramelization magic, but the cleanup is a dream, and the kids can help lay everything out on the pan.
Substitutions
Chicken thighs to chicken breast: Totally doable, but reduce the cooking time by about one minute per side and pull them off the heat the moment they are cooked through. Breast meat punishes you for overcooking.
Fresh pineapple to canned pineapple chunks: Fresh pineapple is beautiful here, but it releases more liquid. If using fresh, pat those chunks dry, just like you do the chicken, or your sauce will be thin. About 2 cups of fresh chunks equals one standard can.
Soy sauce to tamari or coconut aminos: Tamari is a great gluten-free swap with an almost identical flavor. Coconut aminos are sweeter and less salty, so taste as you go and reduce the honey slightly if you make that switch.
White rice to jasmine or brown rice: Jasmine rice is actually my preference. It has a slightly floral quality that echoes the pineapple. Brown rice works too; just cook it separately according to package directions since it takes much longer than white.
Equipment
- Large skillet or wok (12-inch minimum) with a lid
- Medium saucepan for rice
- Small mixing bowl for the sauce
- Whisk
- Cutting board and sharp chef’s knife
- Microplane or box grater for fresh ginger
- Paper towels for patting the chicken dry
- Tongs
- Measuring spoons and a liquid measuring cup
- Step stool (if your six-year-old insists on being the official chicken-pat supervisor)
Storage Tips
Make Ahead
- The sauce can be whisked together and stored in a sealed jar in the fridge for up to 3 days before you need it
- Chop and portion your chicken a day ahead and keep it covered in the fridge
- Cook a big batch of rice at the start of the week; leftover rice actually fries and sauces better than freshly cooked
Refrigerator
- Store leftovers in an airtight container in the fridge for up to 4 days
- Keep the rice and chicken separate if possible; rice stored with the saucy chicken soaks up all the liquid and gets a little mushy
- Let everything cool completely before sealing to avoid condensation
Freezing
- The chicken and sauce freeze beautifully for up to 2 months in a freezer-safe container
- Rice freezes well too; portion it into individual servings in freezer bags, pressing flat to save space
- Do not freeze fresh cilantro garnish; add it fresh when you reheat and serve
Reheating
- Reheat the chicken gently in a covered skillet over medium-low heat with a splash of water or pineapple juice to loosen the sauce
- Microwave works in a pinch; cover with a damp paper towel and heat in 90-second increments, stirring in between
- For rice, a few drops of water before microwaving prevents that sad, hard clump situation
Family Secret Worth Sharing
The real secret to this dish comes straight from something my mom used to do, which I thought was weird until I tried it myself: she always added a tiny bit of reserved pineapple juice to the rice cooking water instead of using plain water. Not all of it, just a couple tablespoons. The rice comes out with this barely-there sweetness that you cannot quite identify but absolutely notice. Ben figured it out one night and demanded I tell him what I did differently. When I explained, he looked at me with the most serious face and said, “Grandma was a genius.” She really was.
Troubleshooting FAQs
Why is my sauce not thickening into a glaze?
The most common culprit is not enough heat or too much liquid. Make sure your pan is on medium-high when you add the sauce, and if you used fresh pineapple, it likely released extra juice. Give it an extra minute or two, stirring constantly. If it still will not tighten up, mix half a teaspoon of cornstarch with a teaspoon of cold water and stir it in.
My chicken is cooked through, but there is no golden crust. What happened?
Two things cause this: crowding the pan and wet chicken. If pieces are touching, they steam instead of sear. Work in batches, leave space between each piece, and make absolutely sure you have patted every surface dry with paper towels before seasoning. A dry surface is what creates that caramelized, golden crust.
The dish came out way too sweet. How do I balance it?
Add an extra teaspoon of rice vinegar or a small squeeze of fresh lime juice right at the end. A little more soy sauce also helps pull things back into balance. If you used sweetened pineapple juice instead of the unsweetened reserved juice from the can, that is likely the cause. Always check the label.
Can I make this in a slow cooker for a busy day?
Yes, with a small adjustment: sear the chicken first in a skillet for color and flavor, then transfer everything to the slow cooker with the sauce. Cook on low for 3 to 4 hours. The texture is softer and less caramelized than the stovetop version, but it is still deeply flavorful and incredibly hands-off. Add the cornstarch slurry in the last 20 minutes with the lid cracked to let it thicken.
From Our Table to Yours
Friday nights in our house smell like pineapple and soy sauce now, and honestly I would not have it any other way. There is something about watching Mia push the cilantro to the edge of her bowl with this long-suffering expression and Ben announcing the meal is “restaurant quality” with rice on his chin that makes all of it feel exactly right. This pineapple chicken and rice sits alongside our beloved easy chicken dinner recipes and has honestly become one of our most requested Asian dishes in the regular rotation. Whenever I need a crowd-pleaser that lands somewhere between comfort food and something that feels a little special, this is the one I reach for, right up there with our other favorite chicken and rice dishes that have carried us through busy school weeks and lazy Sunday nights alike.
Please remember to snap a picture of your pineapple chicken and rice before that… (trust me, it will disappear quickly!), and leave a rating below. We’d love to hear how this pineapple chicken and rice becomes part of your family dinner story.
Star rate this recipe and join our warm kitchen family.