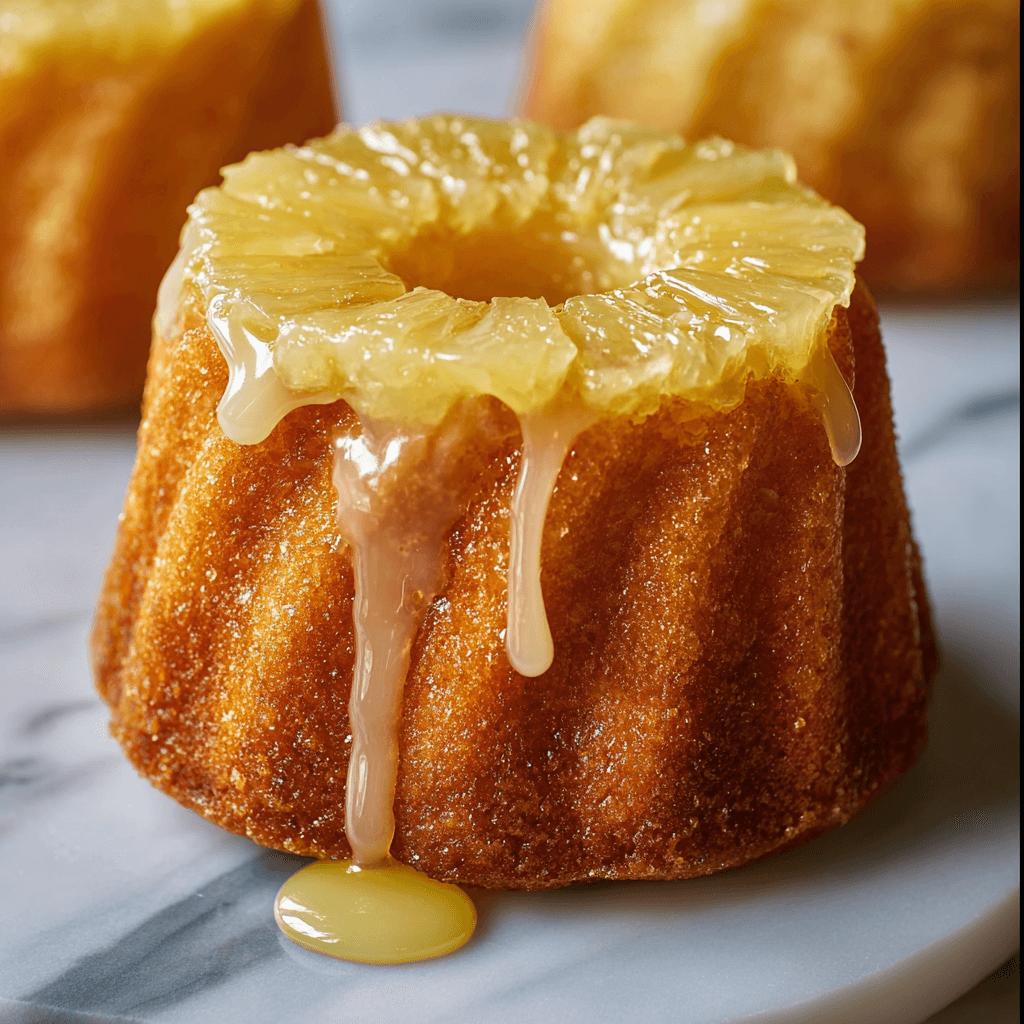
I drizzled the glaze on while my Pineapple Cakes were still steaming hot from the oven. It disappeared immediately. Mia watched and said it was like magic but sadder. Leo tasted one, shrugged, and said he could not tell the difference. I could. I stood there with an empty jug and nothing to show for it. Cool the cakes first. Always cool the cakes first.
Why This Recipe Is Special
There is something about a mini cake that makes people unreasonably happy. Something about the individual size, the fact that it is entirely yours, and no sharing required makes Mia pick them up and examine them like she is appraising something valuable. These mini pineapple cakes are moist in a way that feels almost impossible given how simple the batter is. The pineapple juice works directly into the crumb, giving every bite a bright tropical sweetness that doesn’t taste artificial or overworked. And the pineapple juice glaze on top once you learn to apply it at the right temperature, which I now know sets into a sticky, glossy coat that makes each little cake look like it belongs in a bakery window.
How To Make Pineapple Cakes
After the glaze disaster I already told you about, I made three more batches in the same week trying to perfect the texture. Batch two was too dense; I had overmixed the batter and developed too much gluten. Leo ate it politely and said nothing, which is actually a worse sign than a face. Batch three was underbaked in the center, and Mia detected this immediately with her fork, the way she always does, and held it up to the light like forensic evidence. Batch four was the one. Light crumb, clear pineapple flavor all the way through, and a glaze that actually sat on top and did its job.
Main Ingredients
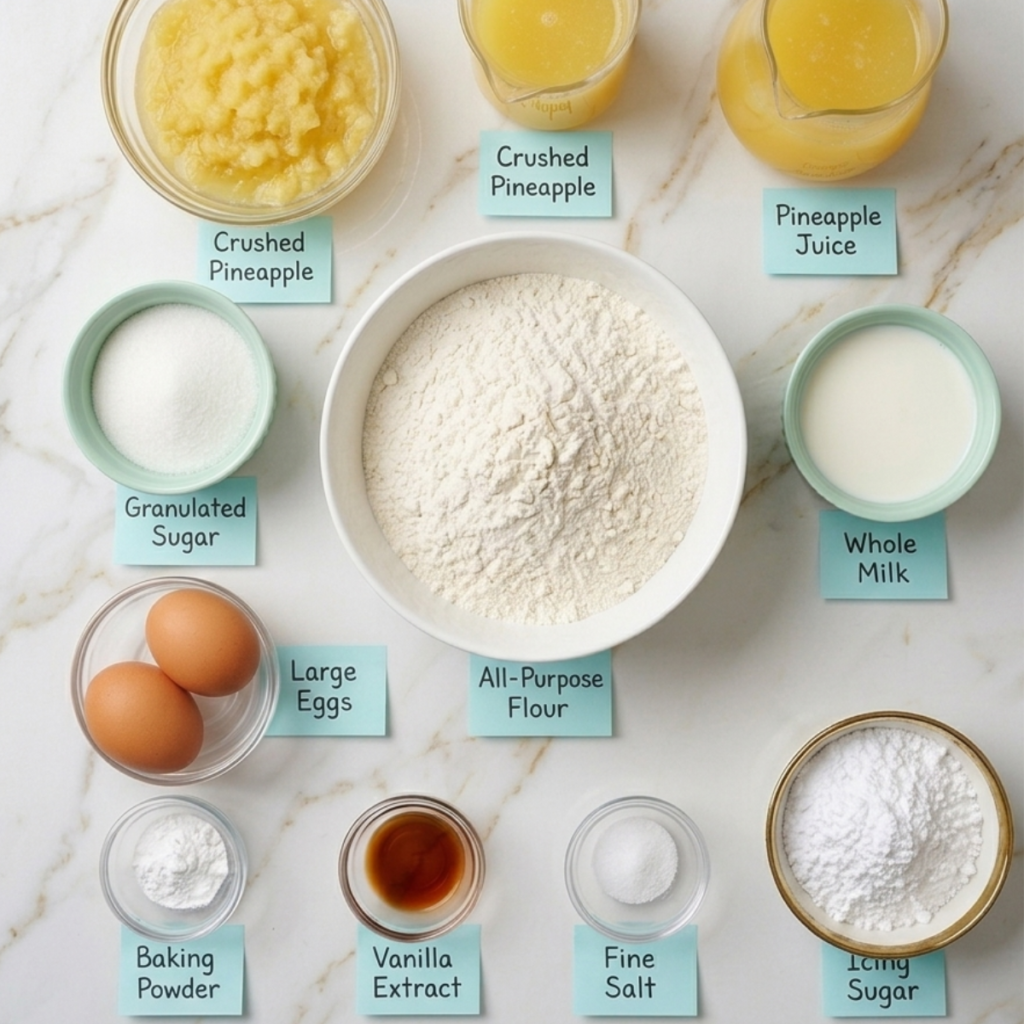
- 1 cup plain all-purpose flour: spooned and levelled, not scooped; too much flour makes the crumb dense
- ½ cup pineapple juice (from a can of crushed pineapple): the flavour carrier for the entire cake; use juice from the tin, not bottled
- ½ cup crushed pineapple, well drained: drain thoroughly or the batter becomes too wet; reserve the juice for the glaze
- ½ cup granulated sugar: the pineapple is already sweet so this doesn’t need to be heavy
- ¼ cup unsalted butter, melted and cooled: melted butter gives a denser, moister crumb; cool it before using or it cooks the eggs
- 2 large eggs, room temperature: room-temp eggs mix more evenly; cold eggs can make melted butter seize
- ¼ cup whole milk: full-fat only; lower-fat milk makes these noticeably drier
- 1½ tsp baking powder: check it is not expired; small batters need every bit of lift
- 1 tsp pure vanilla extract: rounds the pineapple flavour; don’t skip it
- ¼ tsp fine salt: sharpens the sweetness; always in a sweet bake
For the Pineapple Juice Glaze
- 1 cup icing sugar, sifted: sifting prevents lumps from forming in the glaze
- 3 to 4 tbsp pineapple juice: add gradually until you reach a thick but pourable consistency
- Pinch of salt: cuts through the sweetness and makes the pineapple flavour brighter
Step-by-Step Instructions
Step 1: Prep the Pan and Preheat
- Preheat oven to 175°C (350°F) and generously grease a 12-cup mini bundt or muffin pan.
- Drain the crushed pineapple thoroughly through a fine sieve, pressing gently; reserve all the juice.
- Measure out ½ cup of the reserved juice for the batter and set the rest aside for the glaze.
- Melt butter and let it cool to room temperature before using; warm butter can cook the eggs.
Step 2: Mix the Batter
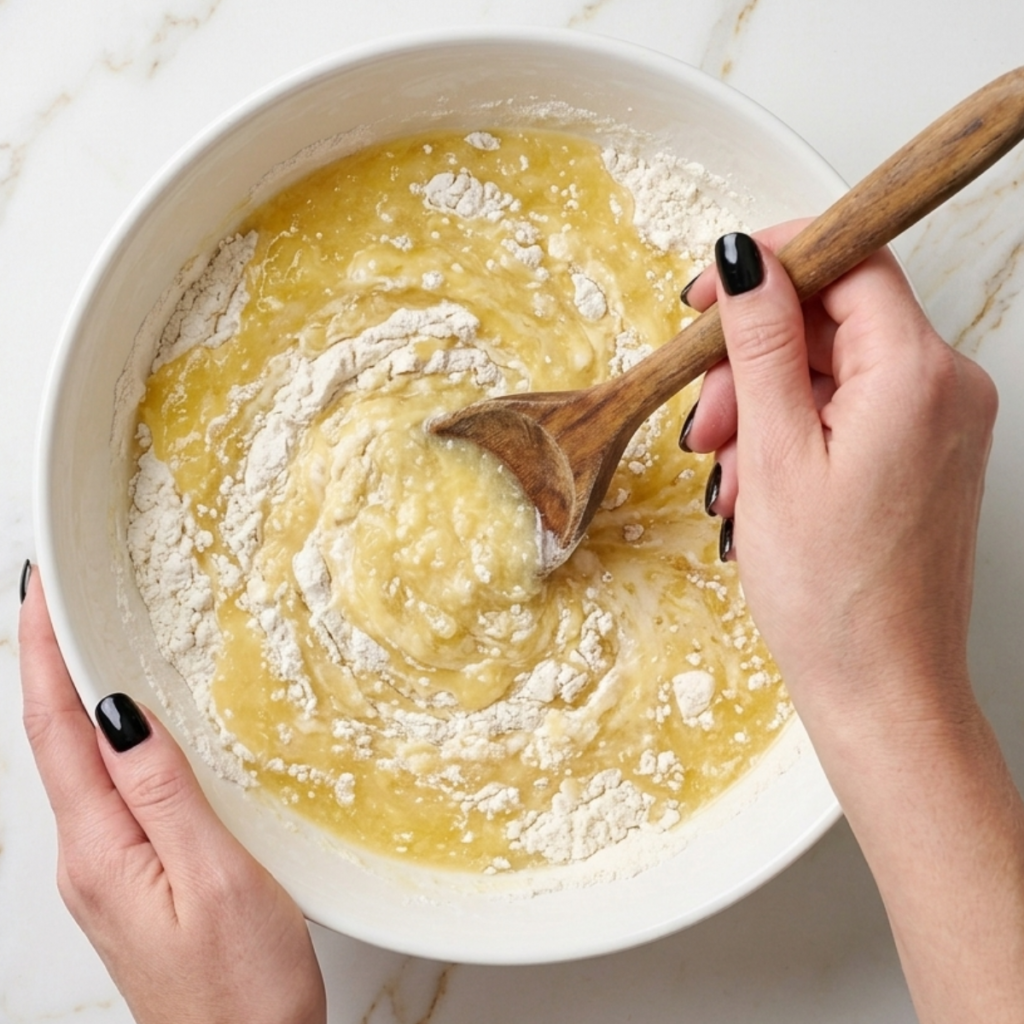
- Whisk together flour, baking powder, and salt in a large bowl; make a well in the center.
- In a separate bowl, whisk eggs, sugar, melted butter, milk, pineapple juice, and vanilla until smooth.
- Pour wet ingredients into the dry ingredients and stir gently until just combined: stop the moment the flour disappears.
- Fold in the drained crushed pineapple with a spatula; the batter will be slightly thick, and that is correct.
Step 3: Fill and Bake
- Fill each cup of the prepared pan no more than halfway; these cakes rise considerably.
- Tap the pan firmly on the counter twice to release any air pockets in the batter.
- Bake for 22 to 25 minutes until a skewer inserted in the center comes out clean and tops are golden.
- Cool in the pan for 8 minutes before turning out onto a wire rack to cool completely.
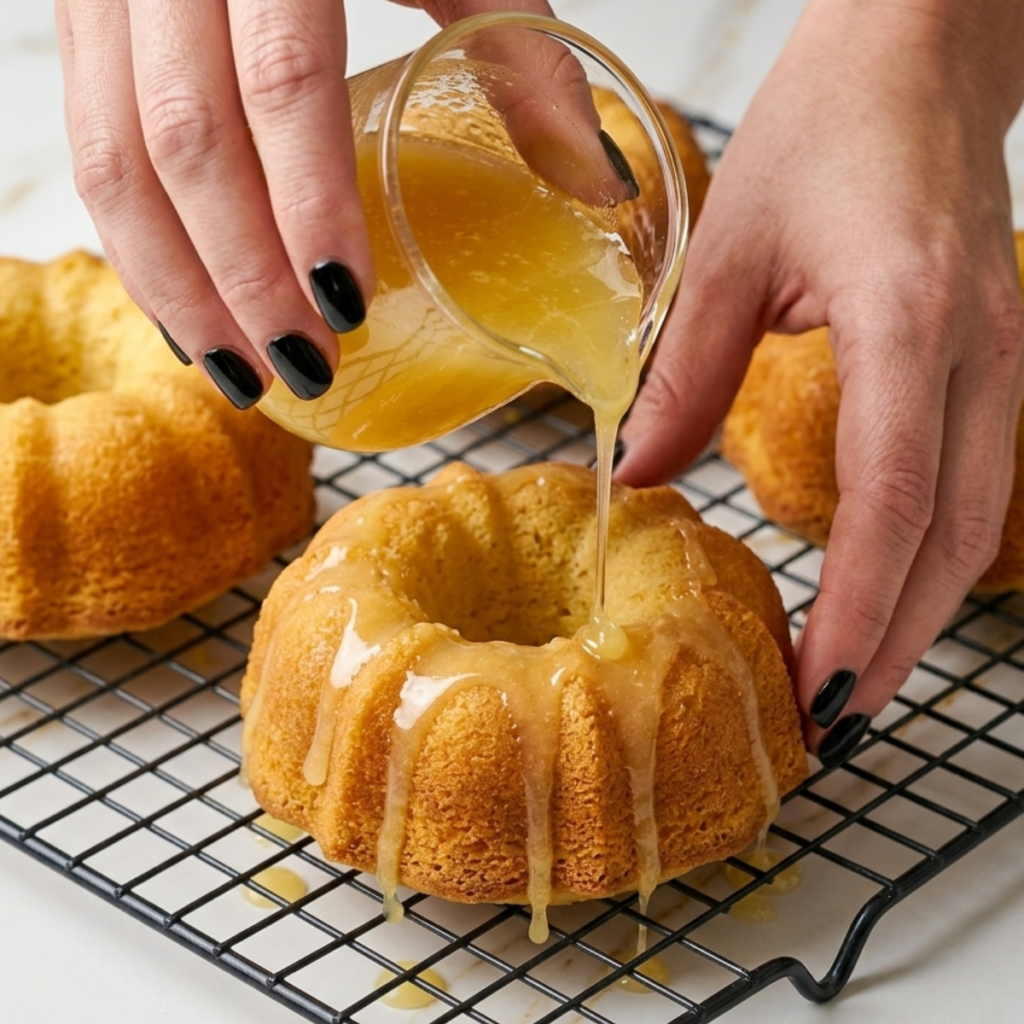
Step 4: Make the Glaze and Finish
- Whisk sifted icing sugar with 3 tablespoons of pineapple juice and a pinch of salt until smooth and pourable.
- Add the fourth tablespoon of juice only if needed; the glaze should coat a spoon, not run off it.
- Wait until cakes are completely cool to room temperature, not warm, not barely warm, but completely cool.
- Spoon glaze slowly over each cake and let it drip naturally down the sides; do not rush this step.
Pineapple Cakes Variations
Pineapple Bundt Cake with Coconut Glaze
Make the batter as written, but pour it into a single greased 9-inch bundt pan instead of the mini cups. Bake for 45 to 50 minutes. For the glaze, replace 1 tablespoon of pineapple juice with coconut cream and scatter toasted coconut flakes over the top before the glaze sets. Leo called this version “the fancy one” and requested it for his birthday, which I am taking as a permanent mandate.
Mia’s Pineapple Upside-Down Mini Cakes
Place a small pineapple ring and a maraschino cherry in the bottom of each greased muffin cup before pouring in the batter. Bake as directed and invert immediately while still warm. Mia discovered this variation by accident when she put decorations in the tin “to make them prettier” before I poured the batter. She was not wrong. They are significantly prettier and they taste even better, and she has not let me forget her role in inventing them.
Pineapple Juice Cake With Pudding
Add one small packet (3.4 oz) of instant vanilla pudding mix directly to the dry ingredients before mixing. The pudding adds moisture, density, and a faint creaminess that makes these feel like a pineapple juice cake with pudding from a box but genuinely better because everything else is from scratch. The texture becomes almost custard-like at the center, ideal for serving warm with a scoop of vanilla ice cream.
Substitutions
Fresh pineapple juice → Canned pineapple juice: Canned is actually preferred; the acidity is more consistent. Fresh pineapple juice contains bromelain, an enzyme that can interfere with the batter’s structure if used in large quantities.
Whole milk → Coconut milk: Full-fat coconut milk works as a direct 1:1 swap and adds a faint coconut note that pairs beautifully with pineapple. It also makes the crumb slightly more tender.
Plain flour → Gluten-free 1:1 baking flour: Works well with no other adjustments. The crumb is slightly more delicate, so handle the cakes gently when turning out. The glaze works identically.
Butter → Refined coconut oil: Use refined, not virgin, melted and cooled in the same quantity. The flavor is neutral, and the texture is nearly identical. Makes the recipe dairy-free if you also swap the milk.
Equipment
- 12-cup mini bundt pan or standard muffin tin
- Two large mixing bowls
- Fine mesh sieve (for draining pineapple and sifting icing sugar)
- Whisk
- Rubber spatula
- Skewer or toothpick for testing
- Wire cooling rack non-negotiable for the glaze step
- Small jug or spouted bowl for pouring glaze
Storage Tips
Make Ahead
- Bake cakes up to 1 day ahead; store unglazed at room temperature covered.
- Make the glaze fresh on the day you serve it; it thickens in the fridge.
Room Temperature
- Glazed cakes keep at room temperature for up to 2 days loosely covered.
- The glaze softens slightly by day 2, and is still delicious.
Refrigerator
- Airtight container up to 4 days; bring to room temperature before serving.
- Cold cakes lose their tropical freshness; always serve at room temperature.
Freezing
- Freeze unglazed cakes individually wrapped for up to 2 months.
- Thaw at room temperature, then glaze fresh before serving.
Family Secret Worth Sharing
The temperature of the glaze meeting the cake is the whole game with these. I learned this the hard way a hot cake is too porous and too warm to hold any kind of glaze; it just absorbs it and disappears, exactly the way mine did on the first attempt. But there is also a window going the other direction: if the glaze itself is too thick when you pour it, it sits in a clump on top instead of draping naturally down the ridges of the bundt shape. The perfect moment is a completely cooled cake and a glaze that is just barely thick enough to coat the back of a spoon. Mia now tests the glaze consistency before every batch by running a spoon through it and watching how it falls. She calls this quality control. She does it with the solemnity of a professional. Leo stands nearby and waits for the leftover glaze in the jug, which is always his job and which he takes very seriously.
Troubleshooting FAQs
Why did my glaze disappear into the cake?
The cake was not fully cooled. This is the exact mistake I made on batch one. A warm cake is essentially a sponge; it pulls the glaze straight in. Give the cakes a full 30 minutes on the wire rack at room temperature before you go anywhere near the glaze jug. Patience is the only fix here.
My cakes are dense and heavy what went wrong?
Almost certainly overmixing. Once the wet and dry ingredients meet, stir only until the flour disappears. Every extra stir after that develops gluten and compresses the crumb. Also check that your baking powder isn’t expired; old baking powder and a small batter like this don’t get on well.
Can I use a blender to mix the batter?
Yes, briefly, this is effectively a pineapple cake made with a blender, and it works well. Blend the wet ingredients, including the pineapple, first until smooth, then fold in the dry ingredients by hand with a spatula. Do not blend the full batter; the gluten development will make the cakes tough.
Can I make this as one large pineapple cake instead of mini cakes?
Absolutely. Pour the batter into a greased 8-inch round or square tin and bake at 175°C for 30 to 35 minutes. The same glaze works perfectly. Check at 30 minutes with a skewer; the center should come out clean. The glaze rule is the same: completely cool before you pour.
Twelve Little Cakes and Zero Left by Morning
I make these on Friday afternoons now, when the week is winding down and both kids can sit at the counter and watch without being rushed somewhere. Leo does the spoon-tapping on the counter to release the air. Mia does the glaze quality control with enormous seriousness. And then we wait properly this time, the full thirty minutes, and the cakes come out golden and sticky and smelling like every good tropical thing at once. The cooling rack is always empty by the time we wake up on Saturday. That is the only review I need.
If you are building your collection of easy dessert recipes that actually deliver something special, these mini pineapple cakes belong on that list. They sit right alongside our healthy brownie recipe as a bake that looks more impressive than the effort involved. And if you want more sweet baking ideas worth trying, the banana bread world is just one click away for another delightful fruit-forward bake.
Don’t forget to snap a picture of your pineapple cakes before that golden glaze disappears along with the cakes themselves (trust me, it will disappear quickly!), and leave a rating below. We’d love to hear how these pineapple cakes become part of your weekend baking story.