The first time I made brown butter brookies, I burned the butter so badly Jake came running in yelling, “MOM IS IT A FIRE?” Emma stood in the doorway holding her stuffed rabbit, looking genuinely concerned. I started over and burned it again during a homework argument. Third try? The most extraordinary thing I have ever pulled from our oven. The smoke alarms were honestly worth it.
Why This Recipe Is Special
A brookie is exactly what it sounds like: a brownie and a cookie baked into one impossibly delicious bar. But this version is not just any brookie. The butter gets browned first, filling the kitchen with that warm, nutty, almost caramel smell that makes both kids materialize at the counter without being asked. The layers are built in a specific order so neither one overbakes you get a genuinely fudgy brownie bottom and a genuinely chewy cookie top in the same bite. It is a completely unreasonable amount of joy in one pan.
How To Make Brown Butter Brookies
By my third attempt, I had both kids stationed at the stove with me. Jake was on official brown-butter watch; his job was to tell me the moment the foam settled and he could see the golden bits forming at the bottom. He took this responsibility extremely seriously. Emma pressed the first layer of cookie dough into the pan and kept sneaking chips from the bowl. “That is a tax,” she told me, completely straight-faced. Nine years old, going on forty-five. The whole kitchen smelled like a bakery, and even the process was worth it.

Main Ingredients Brownie Batter
- 10 tbsp salted butter: Browned in a light-colored pan until nutty and golden. The whole flavor foundation.
- 3 tbsp vegetable oil: Keeps the brownie fudgy even after cooling. Do not skip.
- 4 oz semi-sweet chocolate, finely chopped: Melted directly into the warm brown butter.
- 1/4 cup cocoa powder: Used alongside the melted chocolate for extra depth.
- 3 large eggs, room temperature: Whisked with sugar until fully dissolved for that shiny crust.
- 1 cup granulated + 1/4 cup powdered sugar: The combo creates the gorgeous, paper-thin, shiny brownie top.
- 2 tsp vanilla extract + 1/2 tsp salt: Real vanilla only.
- 1 cup all-purpose flour Spooned and leveled, never scooped.
Main Ingredients Cookie Dough
- 3/4 cup salted butter, melted: Melted, not browned; this is what makes the cookies chewy.
- 3/4 cup each of granulated and brown sugar: Brown sugar keeps them soft and chewy for days.
- 2 large eggs + 2 tsp vanilla, room temperature: Room-temp eggs mix in smoothly.
- 2 1/4 cups flour + 1 tsp baking soda + 1/2 tsp salt: Fold until just combined.
- 2 cups semi-sweet chocolate chips: 1.5 cups in dough, rest scattered on top before baking.
Step-by-Step Instructions
Step 1: Make the Cookie Dough
- Melt the butter, then whisk in both sugars, both eggs, and vanilla until smooth.
- Stir in the flour, baking soda, and salt until just combined; do not overwork.
- Fold in 1 1/2 cups of chocolate chips, keeping the rest for topping.
- Divide the dough in half, press one half into a parchment-lined 9×13 to form a sheet, carefully lift it out intact, and set it aside; this is your middle layer.
Step 2: Brown the Butter and Build the Brownie Batter
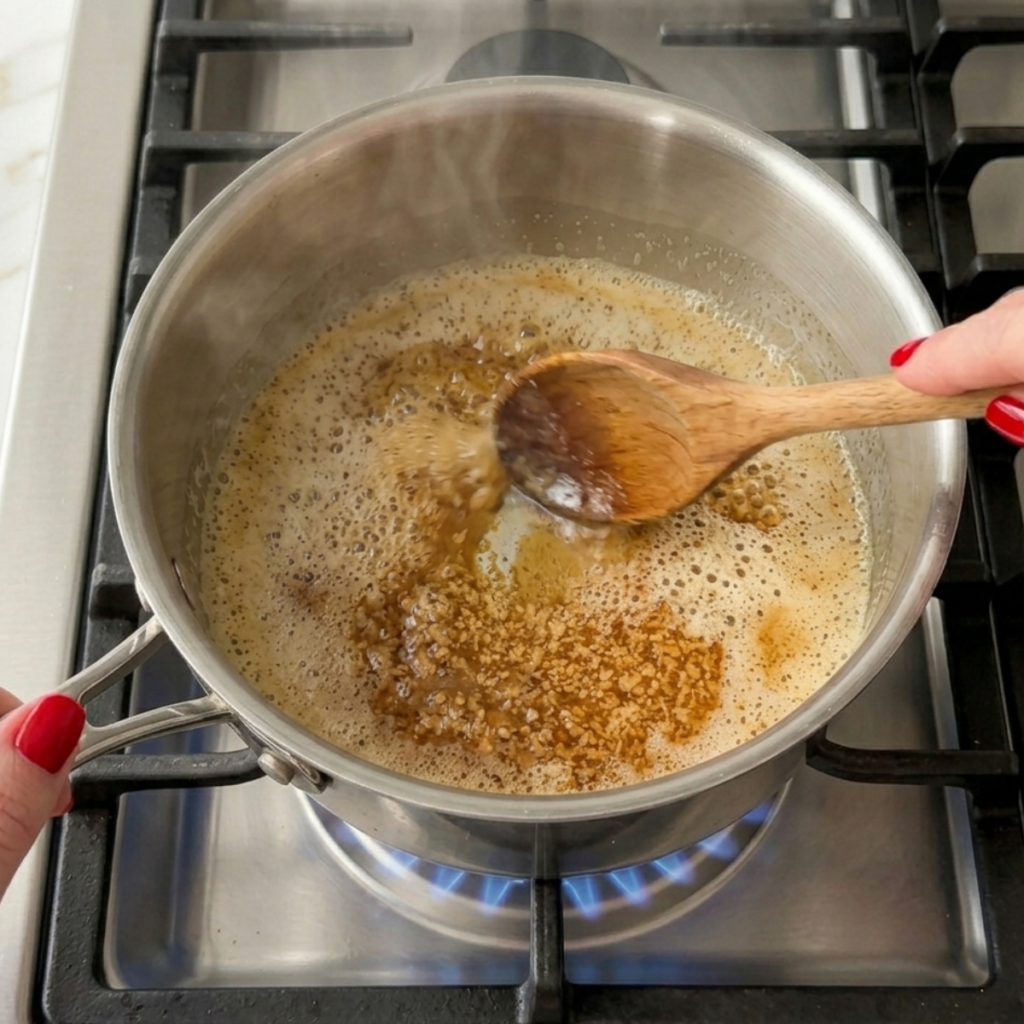
- Melt 10 tbsp butter in a light-colored saucepan over medium heat, stirring constantly, until it foams, the foam settles, and golden-brown specks form on the bottom with a nutty caramel aroma; then pull off heat immediately.
- Whisk in chopped chocolate, vegetable oil, and cocoa powder until smooth, then cool 5 minutes.
- In a separate large bowl, vigorously whisk eggs and granulated sugar for 2 full minutes until sugar dissolves, then whisk in powdered sugar, vanilla, and salt.
- Fold the chocolate mixture into the egg bowl, then gently fold in the flour until no dry streaks remain.
Step 3: Layer and Assemble

- Preheat oven to 350°F (175°C) and line a fresh 9×13 pan with parchment, leaving an overhang on both long sides.
- Spread half the brownie batter in an even layer across the bottom of the pan.
- Lay the pre-formed cookie dough sheet directly on top of the brownie layer.
- Spread the remaining brownie batter over the cookie layer, then drop the remaining cookie dough in small discs across the surface and scatter the reserved chocolate chips.
Step 4: Bake, Rest, and Slice
- Bake for 26 to 30 minutes: edges set, top matte not shiny, toothpick has moist crumbs, not wet batter.
- Do not overbake; they finish setting as they cool and will look slightly underdone when right.
- Cool in the pan for at least 30 minutes before lifting out using the parchment handles.
- For the cleanest slices, cool fully and wipe the knife between cuts or cut warm and embrace the glorious mess.
Brown Butter Brookies Variations
The Salted Caramel Drizzle (Emma’s “Make It Pretty” Edition)
Emma’s position is that everything is improved by being drizzled on. She is mostly correct. Drizzle the cooled brookies with salted caramel sauce and a scatter of flaky sea salt before slicing. The caramel soaks into the top cookie layer, and the salt cuts through all that chocolate richness in a way that makes your eyes close involuntarily. Emma presents these with the energy of someone accepting an award.
The Peanut Butter Swirl (Jake’s Non-Negotiable Request)
Jake decided that all chocolate things are better with peanut butter, and he is simply not wrong. After pouring the top brownie layer, drop five or six large spoonfuls of peanut butter across the surface and drag a butter knife through in slow, lazy swirls. The peanut butter bakes in and creates rich, salty ribbons through the fudgy layer. Jake calls this “the best thing in our house,” and I choose not to take that personally.
The White Chocolate and Raspberry (My Quiet Afternoon Version)
When I get the kitchen to myself, rare and precious, I swap half the semi-sweet chips for white chocolate and press eight or ten fresh raspberries into the top layer before baking. They create little jewel-like pockets of tart fruit against the dark chocolate richness. The fanciest thing this kitchen has produced, and it takes no extra effort at all.
Substitutions
- Salted butter → Unsalted works in both layers; add an extra pinch of salt to each. The brown butter flavor comes from the browning process, not the salt.
- Semi-sweet chocolate → Dark chocolate (60 to 70% cacao) gives a more intense, less sweet brownie. Milk chocolate makes the whole bar sweeter.
- Vegetable oil → Any neutral oil works: sunflower, canola, or light coconut. Avoid olive oil. Do not leave it out; it keeps the brownie fudgy rather than cakey.
- All-purpose flour → A 1:1 gluten-free baking flour works in both layers with no other changes. Tested for a friend, the brookies disappeared in under an hour.
Equipment
- 9×13 inch baking pan
- Parchment paper
- Light-coloured saucepan (essential for browning butter)
- Two large mixing bowls
- Whisk
- Rubber spatula
- Kitchen scale (highly recommended)
- Oven thermometer
- Cooling rack
- Sharp knife for slicing
Storage Tips
Make Ahead
- Make both batters and the pre-formed cookie sheet up to 24 hours ahead, cover, and refrigerate.
- Let everything come to room temperature for 20 minutes before assembling and baking.
- The fully assembled unbaked pan can be refrigerated overnight and baked fresh the next day.
Refrigerator
- Store cooled sliced bars in an airtight container at room temperature for 3 to 4 days.
- If your kitchen runs warm, the fridge extends freshness to 5 to 6 days; bring it to room temperature before eating.
- A 10 to 15 second microwave warm-up restores that just-baked fudgy texture beautifully.
Freezing
- Freeze fully cooled individual bars on a baking sheet first, then transfer to a zip-lock freezer bag.
- Keeps well for up to 2 months; the brownie layer freezes particularly well.
- Thaw at room temperature for an hour or warm gently in the microwave from frozen.
Reheating
- Microwave a single bar for 15 to 20 seconds; it comes back to life spectacularly.
- Oven: place bars at 300°F for 6 to 8 minutes, covered loosely with foil.
- Serve warm with vanilla ice cream if you want to cause a scene in your own kitchen.
Family Secret Worth Sharing
Brown butter terrified me for years. It goes from perfect to ruined so fast that the first two times I made these, I either pulled it too early or went two seconds too far into a smoky kitchen and two alarmed children. The fix my mom finally showed me: use a light-colored pan so you can actually see the color change. Dark nonstick hides everything, and that is how you end up overcooking it every time.
Watch for three stages: first it foams, then the foam settles, then tiny golden-brown specks appear on the bottom, and it smells like warm hazelnuts and caramel. That third-stage moment five seconds after the smell hits you is when you pull it off the heat. Jake now does brown-butter watch for me every single time and has not let it burn once. A nine-year-old can be a better brown-butter guardian than you would ever expect.
Troubleshooting FAQs
My brookies came out cakey instead of fudgy. What happened?
Almost certainly overbaked. The centers should look barely set when you pull them; they finish cooking from residual heat. A toothpick with wet batter is too much; moist crumbs are exactly right. Set a timer for 26 minutes and check from there.
The layers mixed together when I assembled. How do I keep them separate?
The key is the pre-formed middle cookie layer. Press it into parchment first, lift the whole sheet out, and lay it on top of the brownie batter. Also let the butter mixture cool 5 minutes before folding in the flour so the batter is not too warm at assembly.
My brown butter keeps burning before I reach the nutty stage. Any tips?
Medium heat and a light-colored saucepan. Stir or swirl constantly. Once you smell hazelnut-caramel, you are either there or one second away; pull the pan immediately.
Can I make these in a smaller pan?
Yes, halve the entire recipe and bake in a 9×9 inch pan. Layers will be thicker, so check at 28 minutes. The smaller batch disappears at exactly the same speed, just so you know.
The Bake That Made the Whole Burnt Butter Saga Worth It
Last weekend I pulled a fresh pan of brownies from the oven and set it on the counter to cool. I turned around for four minutes to answer the door. When I came back, Jake had removed a corner piece, the whole corner, clean, and was eating it standing at the counter, looking like he had done absolutely nothing wrong. Emma was watching from the doorway. “He said it was quality control,” she reported, very helpfully.
This is what easy family meals look like in this house: batter-covered counters, a brown-butter guardian who eats the evidence, and a kitchen that smells like the best possible version of a Saturday. If you are looking for comfort food recipes that feel genuinely special, something that makes even a regular Tuesday feel worth the effort, this is the pan right here.
Whether you bake these as a bake sale hero, a birthday treat, a school-night cheer-up, or just as your new favorite breakfast ideas that nobody in the family will technically argue with, these brown butter brookies will earn a permanent place in your life. I have no doubt about that whatsoever.
Don’t forget to snap a picture of your brown butter brookies before that first bar disappears (trust me, it will disappear quickly!), and leave a rating below. We’d love to hear how these brown butter brookies become part of your family baking story.
Star rate this recipe and join our cozy home baking family.