I pulled them out too soon because I was impatient and the toothpick completely lied to me. The center was still fully liquid. Mia took one bite and said “these are definitely not done.” Ben tried to eat his with a spoon and called it “experimental.” That underbaked disaster taught me the one test that makes this chocolate chip banana bread set perfectly every time.
Why This Recipe Is Special
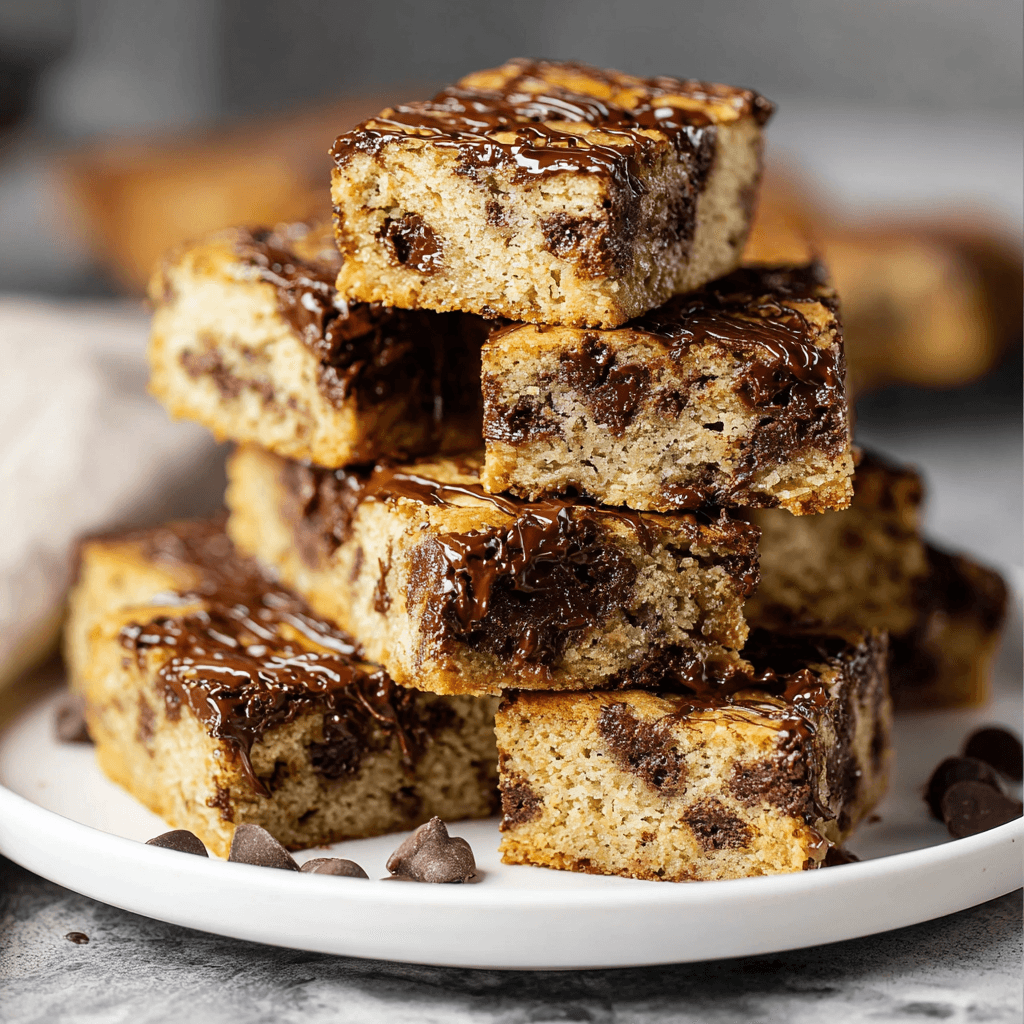
These are not regular banana bread bars. They are dense, fudgy, soft in the center with slightly crispy edges, and loaded with melted chocolate chips that pool on the surface and set into glossy chocolate streaks as they cool. The banana flavor is deep and sweet, and the bars are cut into clean squares that hold their shape on a plate. Mia calls them “banana brownies” and Ben calls them “the chocolate ones,” and both of those names are better than anything I came up with. They disappear within the hour every single time I make them.
How To Make Chocolate Chip Banana Bread
The successful batch came on a rainy Saturday when both kids had announced they were bored and needed a project immediately. Mia was mashing the bananas with a fork and taking her job extremely seriously, announcing “more” every time she thought they needed another mash. Ben was measuring the chocolate chips and quietly eating approximately every fifth one, which he considered a reasonable quality control ratio. When the batter went into the pan and those chocolate chips scattered on top started to look glossy and beautiful, both kids sat in front of the oven window like it was the most important thing happening anywhere in the world. In our kitchen at that moment, it was.
The lesson that fixed the underbaked disaster was understanding that banana bread bars behave differently than a loaf. In a 9×13 pan the batter spreads thin and bakes faster, but the high banana moisture content means the center can look done on the toothpick while still being liquid underneath. The fix is twofold: the toothpick test plus the edge test. The edges should pull away from the pan slightly and feel set and springy when you press them gently. If the edges pass and the toothpick comes out clean, they are done. Ben now does the edge press test every single time and takes it more seriously than I do.
Main Ingredients
- 3 very ripe bananas, mashed – Brown-spotted or almost entirely black; the riper the banana the sweeter and more intensely flavored the bars
- 1/2 cup unsalted butter, melted – Melted rather than creamed for a denser, fudgier bar rather than a cakey one
- 3/4 cup brown sugar, packed – Brown sugar adds depth and a subtle molasses note that white sugar cannot give these bars
- 2 large eggs, room temperature – Room temperature eggs incorporate more evenly and give the bars a more even texture
- 1 teaspoon vanilla extract – Rounds out the banana flavor and the chocolate without competing with either
- 1.5 cups all-purpose flour – Spoon and level; too much flour and the bars become dry and cakey rather than fudgy
- 1/2 teaspoon baking soda – Reacts with the natural acid in the banana for a gentle lift without making these too cakey
- 1/2 teaspoon salt – Enhances every other flavor; do not skip it
- 1/2 teaspoon cinnamon – Warm spice that bridges the banana and chocolate flavors beautifully
- 1.5 cups chocolate chips, divided – One cup stirred into the batter, half cup scattered over the top for those glossy pools of chocolate on the surface
Step-by-Step Instructions
Step 1: Prep the Pan and Mash the Bananas
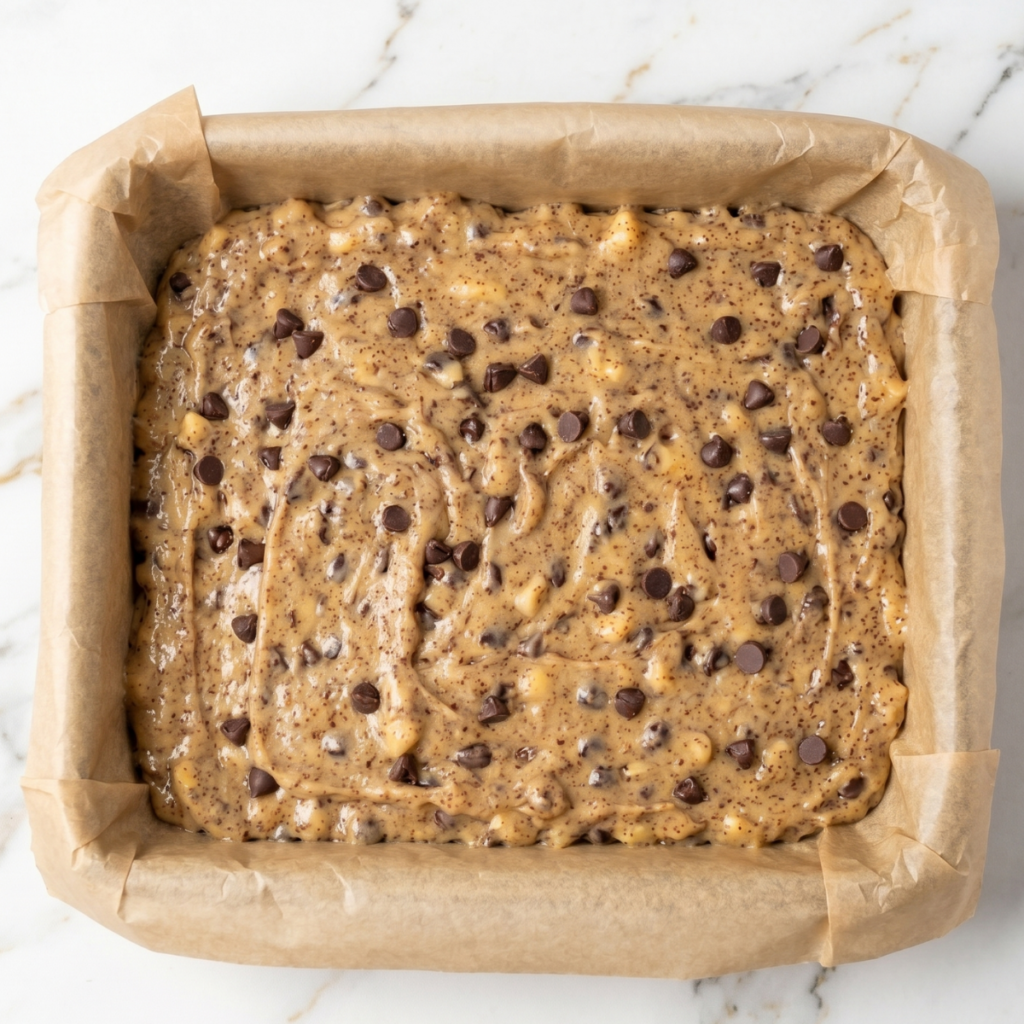
- Preheat your oven to 350 degrees F and line a 9×13 inch baking pan with parchment paper, leaving an overhang on both sides for easy lifting
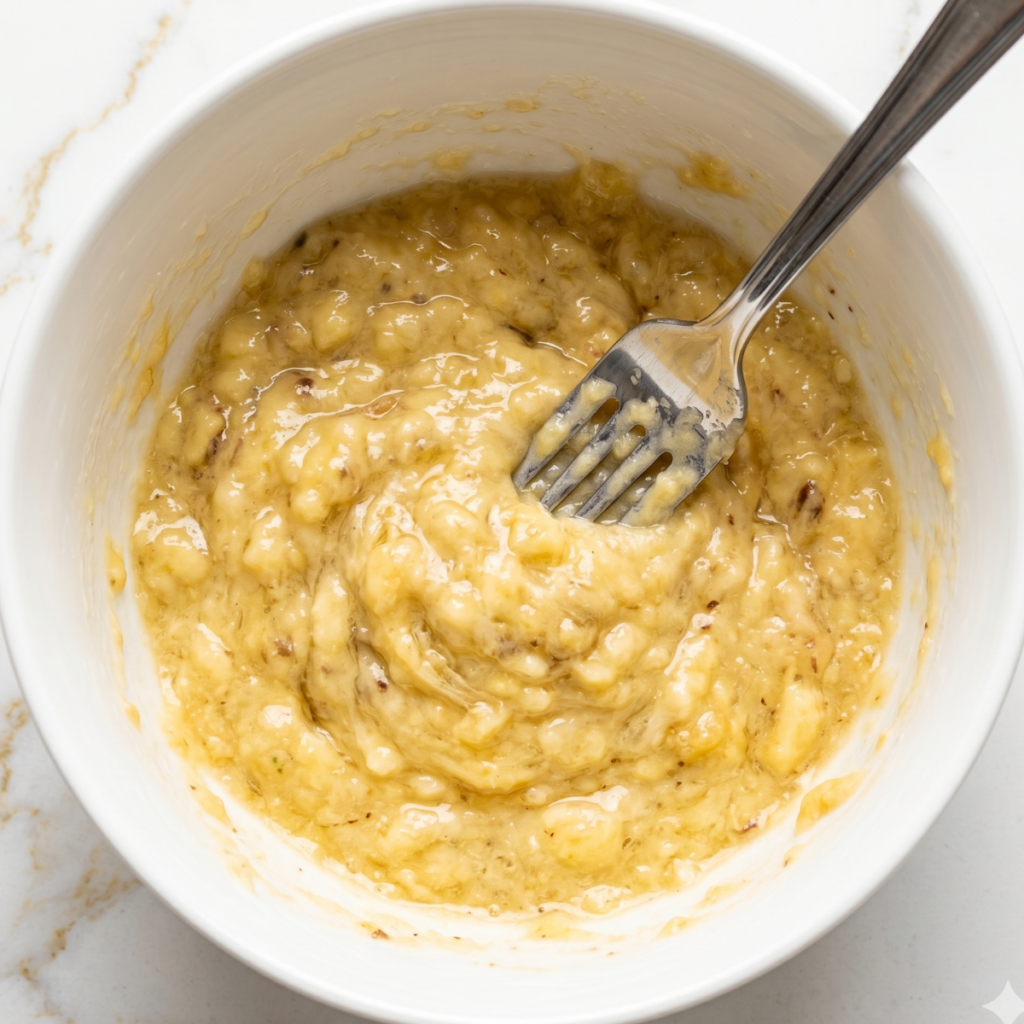
- Peel the ripe bananas into a large bowl and mash thoroughly with a fork until almost completely smooth with only a few small lumps remaining; very ripe bananas will mash easily in about 60 seconds
- The bananas should look like a thick paste rather than a chunky mixture; large banana chunks do not incorporate evenly into the batter and create wet spots in the finished bars
- Melt the butter and let it cool for 5 minutes before adding it to the bananas; hot butter added directly can begin cooking the eggs when they go in and affect the texture
Step 2: Mix the Batter
- Add the melted cooled butter, brown sugar, eggs, and vanilla extract to the mashed bananas and stir with a spatula until completely combined and the mixture looks smooth and uniform
- Sift the flour, baking soda, salt, and cinnamon directly over the banana mixture and fold gently with the spatula until just combined with no visible dry flour streaks remaining
- Do not overmix; stir only until the flour disappears and stop immediately because overworked batter makes tough, cakey bars rather than tender, fudgy ones
- Fold in one cup of the chocolate chips with a few gentle strokes so they are evenly distributed throughout the batter without being broken up
Step 3: Pour, Top, and Bake
- Pour the batter into the prepared pan and spread it evenly to the corners with an offset spatula so the bars bake to a consistent thickness throughout
- Scatter the remaining half cup of chocolate chips evenly over the entire surface of the batter so every bar will have visible chocolate pools on top
- Bake at 350 degrees F for 22 to 26 minutes until a toothpick inserted in the center comes out with just a few moist crumbs and the edges have pulled away from the sides of the pan slightly
- Check both the toothpick and the edges; the edges should feel set and spring back gently when pressed and should look golden and slightly pulling away from the parchment
Step 4: Cool, Cut, and Serve
- Let the bars cool in the pan for at least 20 minutes before attempting to lift or cut them; hot bars will crumble and the chocolate chips need time to reset from liquid back to glossy pools
- Lift the entire slab out of the pan using the parchment overhang and transfer to a cutting board for slicing
- Cut into bars using a sharp knife in one clean downward press without sawing; wipe the knife between cuts for the cleanest edges that do not drag the melted chocolate across the surface
- Serve at room temperature for the best flavor and texture; the chocolate chip pools are at their most beautiful glossy finish once the bars have cooled completely
Chocolate Chip Banana Bread Variations
Mia’s “Double Chocolate” Version
Mia made an announcement after the first successful batch that the bars needed more chocolate, and she was not asking; she was informing. I respect that kind of conviction in a six-year-old. For her version, add three tablespoons of cocoa powder to the dry ingredients alongside the flour and increase the chocolate chips to two full cups, one cup in the batter and one scattered lavishly on top. The bars go darker, richer, and significantly more chocolate-forward while staying just as fudgy. Mia describes the result as “the correct amount of chocolate” and has been eating them this way ever since.
Ben’s “Banana Cheesecake Bars” Version
Ben discovered cheesecake-swirled banana bread at a bakery once and came home with a very specific request and a description that was more detailed than necessary. For his version, beat four ounces of softened cream cheese with two tablespoons of sugar and one egg until smooth, then drop spoonfuls over the batter before the chocolate chips go on top and swirl once with a skewer. The cream cheese layer bakes into a slightly tangy, creamy swirl that turns these into something genuinely special. Ben calls this version “the bakery one” and requests it for every occasion that could possibly justify a special occasion dessert.
The Healthy Banana Bars Version
On the weeks when I want something that feels like a treat but carries a little more nutritional goodness, this version is the one I reach for. Replace the all-purpose flour with whole wheat flour and swap the butter for the same quantity of coconut oil. Reduce the brown sugar to half a cup and add a tablespoon of honey for sweetness. The bars are denser, slightly nuttier, and a touch less sweet than the original, but both kids eat them just as happily, and I feel genuinely good about putting them in lunchboxes. Mia calls them “the healthy ones” with a tone that suggests she suspects I am up to something, which I am, but the bars are good enough that she eats them anyway.
Substitutions
All-purpose flour to oat flour: Certified gluten-free oat flour substitutes in the same quantity and gives a slightly nuttier, more wholesome flavor that pairs beautifully with banana. The bars will be a touch more delicate when warm, so give them the full 20-minute cooling time before cutting.
Brown sugar to coconut sugar: Coconut sugar substitutes in exactly the same quantity and gives a slightly more caramel-like, less sweet result. The bars will be a shade darker in color, and the banana flavor will be more prominent since coconut sugar has a milder molasses note than brown sugar.
Unsalted butter to coconut oil: Refined coconut oil in the same melted quantity gives a very slightly lighter texture and a subtle tropical note that works beautifully alongside the banana. Unrefined coconut oil adds a more noticeable coconut flavor, which some people love and others find too prominent.
Semi-sweet chocolate chips to dark chocolate chips or chunks: Dark chocolate at 60 percent or above gives a less sweet, more intensely chocolatey result that adults tend to prefer. Chocolate chunks rather than chips give larger molten pockets that are genuinely dramatic when you cut the bars. Both substitute in exactly the same quantity.
Equipment
- 9×13 inch baking pan
- Parchment paper with overhang on both sides for easy lifting
- Large mixing bowl for the batter
- Fork for mashing the bananas
- Rubber spatula for folding the batter
- Offset spatula for spreading the batter evenly in the pan
- Sharp knife for slicing; wipe between cuts for clean edges
- Wire cooling rack for cooling the slab before cutting
- Toothpick for testing doneness
Storage Tips
Make Ahead
- These bars are genuinely better the next day once the flavors have settled and the texture firms slightly into that perfect fudgy density
- Bake the day before, cool completely, and cut fresh the morning of serving for the cleanest presentation
- The batter can be mixed up to 24 hours ahead and stored covered in the fridge; stir gently before pouring into the pan and add a few extra minutes to the bake time since the batter will be cold
Refrigerator
- Store cut bars in an airtight container at room temperature for up to 3 days; the refrigerator actually dries out the texture and is not recommended
- If the weather is very warm and the chocolate is getting soft, a brief spell in the fridge is fine but bring back to room temperature for 15 minutes before eating
- Layer bars between parchment sheets in the container to prevent the chocolate tops from sticking together
Freezing
- Freeze individual bars wrapped tightly in plastic wrap and stored in a freezer bag for up to 2 months
- Thaw at room temperature for about 30 minutes and they come back to almost exactly the original texture and flavor
- These bars are excellent eaten slightly frozen on a warm day, which Mia discovered by accident and now considers a feature rather than a defect
Reheating
- These bars are best at room temperature and do not need reheating
- For a warm dessert, microwave one bar at 50 percent power for 20 seconds until just slightly warm; the chocolate chips turn back to liquid pools and the whole thing tastes like it just came out of the oven
- A warm bar with a small scoop of vanilla ice cream is one of the genuinely best things about having made a full batch of these, and Ben discovered this combination on his own and has never looked back
Family Secret Worth Sharing
My mom always browned the butter before adding it to any banana bread recipe she made, and I thought this was a step that only applied to fancy baking until I tried it in these bars and understood immediately. Browning the butter takes about four minutes and gives it a deep, nutty, almost caramel quality that amplifies the banana flavor and makes the chocolate taste more complex. You melt it in the saucepan over medium heat, keep stirring until it foams and then goes golden and smells like toasted hazelnuts, and then let it cool before using it exactly as you would the regular melted butter. I told Ben what browned butter was once while we were making these and he leaned over the saucepan and said “that smells like something really good is about to happen.” He was completely correct. My mom would have liked him very much.
Troubleshooting FAQs
The bars are still liquid in the center after the full bake time. What happened?
The toothpick test alone is not reliable for these bars. You need the toothpick plus the edge test. The edges should pull away from the pan sides slightly and feel set and springy when pressed gently. If the edges pass and the toothpick shows moist crumbs rather than wet batter, the bars are done. If the center still looks wet and jiggly when you shake the pan, add five more minutes and test again. The high banana moisture can make the center look underdone even when it is set.
The bars came out dry and cakey instead of fudgy. What went wrong?
Either the flour was packed into the measuring cup rather than spooned and leveled, the butter was not melted, or the batter was overmixed after the flour went in. All three of these cause a tougher, cakier result. Spoon the flour into the cup rather than scooping; use melted, not softened, butter; and stop folding the moment the flour disappears. Those three habits together produce the dense fudgy bar this recipe is supposed to be.
The chocolate chips on top sank into the batter during baking. How do I prevent that?
Scatter the top chocolate chips after the batter is already in the pan and do it right before it goes into the oven. If you add them to the batter and then spread it, they migrate downward during spreading. Adding them as a topping at the last second means they sit on the surface, begin melting immediately in the oven heat, and stay as visible glossy pools on top rather than sinking.
Can I make these in a smaller pan for thicker bars?
Yes. An 8×8 inch pan gives significantly thicker, more brownie-like bars. Increase the bake time to 30 to 35 minutes and rely on the toothpick plus edge test even more carefully since the thicker batter takes longer to set in the center. The texture will be denser and fudgier than the 9×13 version, which many people prefer. Ben prefers the thicker version and has made his position very clear on this matter.
The Bars That Use Up Every Overripe Banana Before It Can Become Guilt
There are always overripe bananas on our counter. Always. This recipe is why I have stopped feeling bad about them and started feeling excited. Ben watches the bananas all week like they are ripening on a schedule he personally approved. Mia declared last month that she prefers the bananas “really brown” which is something no one in this house said before these bars came along. This chocolate chip banana bread recipe sits naturally alongside our classic banana bread recipe as the other way we celebrate an overripe banana in this kitchen, and for the days when the dessert table needs both something fruity and something truly chocolate-forward, these bars next to our fudgy chewy browkies cover every craving at the table without a single overlap. For the weeks when the baking rotation needs something new to sit alongside our favorite healthy brownie recipes, these bars land in the same category of one-bowl chocolate treats that take thirty minutes and disappear in twenty. Some recipes earn a permanent place in the kitchen, and this one did that quietly and completely.
Don’t forget to snap a picture of your chocolate chip banana bread before that… (trust me, it will disappear quickly!), and leave a rating below. We’d love to hear how this chocolate chip banana bread becomes part of your family baking story.